


A floral photo wall is a vertical display covered in flowers and greenery, perfect for events like weddings, baby showers, and corporate gatherings. These walls offer a stunning backdrop for photos and can be customized to fit any theme or color scheme. Here's a quick guide to creating one:
- Base Structure: Choose from foam boards (budget-friendly), plywood (durable), wooden frames (for heavy designs), or pipe-and-drape systems (portable).
- Flowers: Use a mix of greenery (60%), secondary flowers (30%), and focal blooms (10%). Decide between fresh flowers (short events) or artificial ones (long-lasting).
- Materials: Include chicken wire, zip ties, hinges, and floral wire for assembly. Add personal touches like neon signs or themed props.
- Setup Tips: Ensure stability with sandbags or wall anchors. Position the center of the wall 48–60 inches from the floor for better photos.
DIY costs range from $150–$500, while renting or hiring professionals can exceed $1,000. Whether you build it yourself or enlist help, a floral photo wall can elevate any event space.
DIY Flower Wall Photo Backdrop Build
sbb-itb-2be19a4
Selecting the Base Structure and Materials
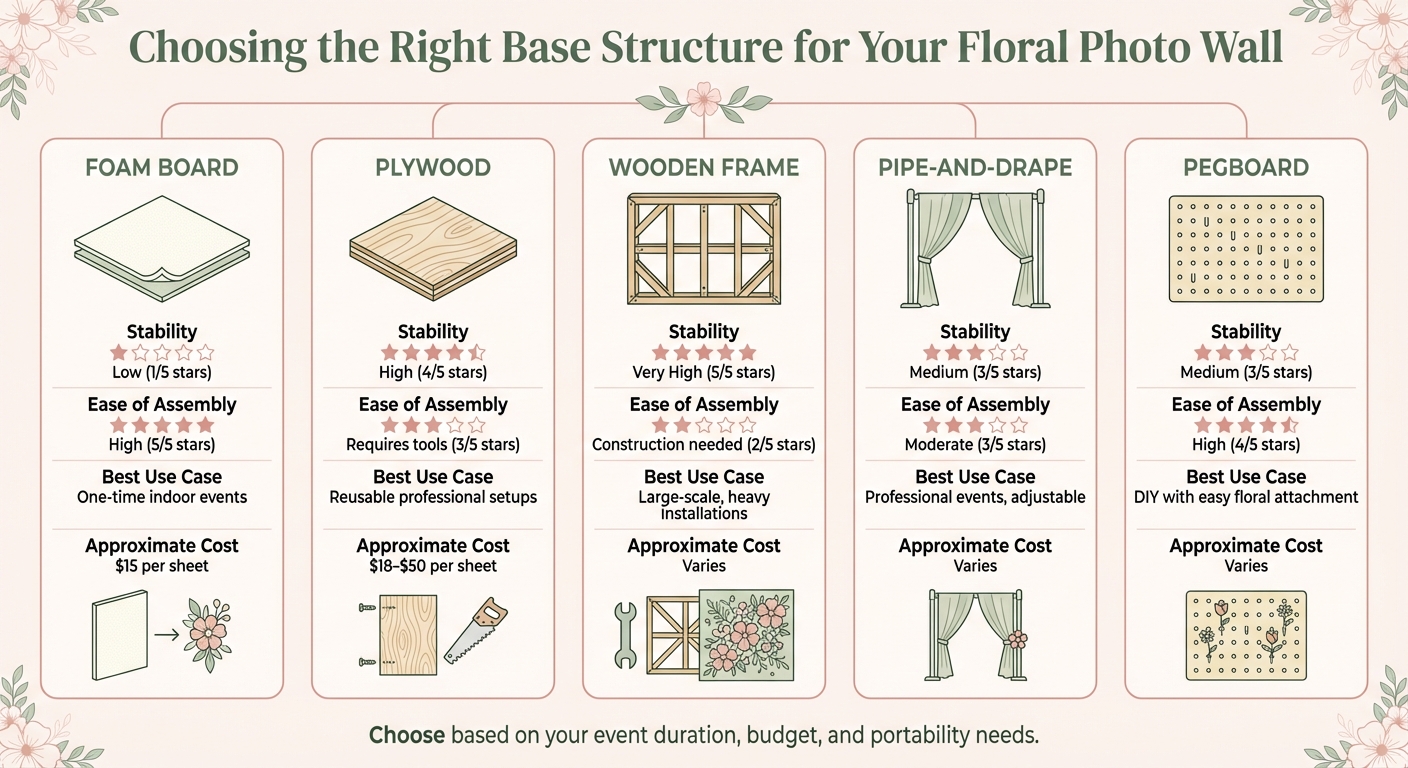
Floral Photo Wall Base Structure Comparison Guide
It's time to turn your plans into action by choosing the right base structure and materials for your floral photo wall. The foundation you pick plays a big role in how well your wall holds up during the event. Whether you're aiming for a portable, one-time setup or a sturdy, reusable display, the choice of base matters.
Base Structure Options
Foam board is a budget-friendly choice, costing about $15 per sheet. It's perfect for single-use indoor events. You can attach it directly to walls with heavy-duty Velcro strips or other hook-and-loop fasteners. For an 8×8-foot backdrop, you'd typically use four 4×4-foot foam boards. However, foam board isn't suitable for heavy fresh flowers and needs wall support since it can't stand on its own.
Plywood panels are a durable option, especially if you plan to reuse your wall. Two 80×40-inch sheets range from $18 to $50 each, depending on the grade. Hinges can be added for easy folding and storage. As Hannah Lowery from Team Flower explains:
To make a flower wall and professional floral backdrop - one that folds easily in half for storage - all you need are [plywood, hinges, and screws].
For a freestanding wall, you can add triangular wooden trusses to the back using a nut-and-bolt system.
For larger, heavier installations, wooden frames built from 1×4 pine boards with chicken wire stretched across offer excellent support. Linda D'Arco from Little Farmhouse Flowers suggests building modular 3-foot sections for easier transport. Adding cross-bracing every 32 inches helps the frame handle the weight of flowers and greenery without warping.
Pipe-and-drape systems are ideal for professional events where quick setup and adjustable sizing are key. These freestanding systems are portable but require sandbags or weights for stability. Pegboard is another DIY-friendly option. With pre-drilled holes, it simplifies flower attachment. Adding 3–4-inch foam spacers behind the pegboard prevents bowing when leaned against a wall.
| Base Material | Stability | Ease of Assembly | Best Use Case | Approximate Cost |
|---|---|---|---|---|
| Foam Board | Low | High | One-time indoor events | $15 per sheet |
| Plywood | High | Requires tools | Reusable professional setups | $18–$50 per sheet |
| Wooden Frame | Very High | Construction needed | Large-scale, heavy installations | Varies |
| Pipe-and-Drape | Medium | Moderate | Professional events, adjustable | Varies |
| Pegboard | Medium | High | DIY with easy floral attachment | Varies |
Once you’ve chosen your base, focus on securing it properly to ensure it stays stable throughout your event.
Securing and Stabilizing the Structure
Stability is crucial. Even a slight tilt can ruin photos.
For outdoor setups, drive 6-foot heavy-duty T-posts into the ground at an angle and secure your wall panels to them with zip ties. This technique provides excellent support against both weight and wind. Designer Sarah Thompson highlights the importance of a solid base:
A stable substrate saves headaches. I often use lightweight plywood, rigid foam board, or modular grid panels.
For indoor setups, lightweight foam boards can be mounted using industrial-strength Velcro, with additional weight added at the base for balance. Heavier plywood walls may need wall anchors or freestanding trusses, while pipe-and-drape systems rely on sandbags to prevent tipping.
Position your floral arrangement so the center sits between 48–60 inches from the floor - this aligns with typical eye height for photos. Leave 18–24 inches of clearance from the floor to avoid crushing flower stems when guests stand in front of the wall.
Materials You'll Need
With your base and stabilization sorted, gather these essential supplies to finish your floral photo wall:
- Chicken wire or faux boxwood panels for attaching flowers (boxwood panels cost about $45 per 40×40-inch square).
- Industrial-strength zip ties and 5/8-inch staples for securing mesh to frames.
- Floral wire for weaving stems through chicken wire, plus wood screws and hinges for plywood setups.
- For foam board walls, a screwdriver or ice pick to create holes for flower stems, along with hot glue to hold them in place.
- If building a wooden frame, include corner support pieces cut at 45-degree angles for extra reinforcement.
- Brown craft paper or landscape fabric to cover the back of your wall and block light from filtering through gaps.
You'll also need a basic tool kit, including a power drill, staple gun, level, wire cutters, and hammer. For stabilization, have sandbags, T-posts, or heavy-duty wall anchors ready, depending on your venue[8–10].
Choosing Flowers and Greenery
Picking the right flowers and greenery is key to completing your design. These elements bring energy and texture to your photo wall, transforming it into a captivating centerpiece. Your choices will shape the overall mood and visual appeal, so start by aligning your selections with the event’s theme and color scheme.
Focal Flowers
Focal flowers are the showstoppers of your design. They grab attention and set the tone for the entire arrangement. Roses, peonies, and hydrangeas are popular options because their size and layered petals create a striking visual effect. To achieve balance, aim for a mix of 60% base greenery, 30% secondary flowers, and 10% accent blooms like peonies or anthurium.
If your event lasts several hours, consider carnations or dahlias - they’re hardy and hold up well without constant hydration. For weddings, soft colors like blush pink, white, or lavender create a romantic atmosphere, while corporate events might call for sleek neutrals or colors that reflect your brand. Orchids are another great choice for a touch of luxury but keep in mind they’ll need water picks to stay fresh.
When arranging focal flowers, group them in clusters of different sizes to mimic a natural flow. For daytime events, lighter shades photograph beautifully, while richer tones create a dramatic effect for evening settings.
Filler Flowers and Greenery
Filler flowers and greenery are your secret weapons for filling gaps and adding depth. Italian Ruscus is a go-to for its durability and year-round availability, while plumosa fern provides a soft, airy texture. Baby’s breath is another classic filler, offering volume and a delicate, romantic vibe.
For tropical themes, palm leaves and monstera are bold choices. You can even spray-paint them metallic gold or silver to fit your color palette. If you’re aiming for a modern look, silver dollar eucalyptus works wonders, while leather fern adds a rustic touch. To create depth, pull some greenery forward by an inch or two and layer darker foliage behind it to create natural shadow effects. Moss or leather fern can also help fill larger spaces without losing textural appeal.
Fresh vs. Artificial Flowers
Your decision between fresh and artificial flowers will depend on factors like event duration, budget, and venue conditions. Fresh flowers bring natural beauty and fragrance but demand careful hydration. As B Floral notes:
If a flower wall will be up for longer than one day, silk flowers are the way to go because fresh blooms will quickly perish and not last.
Fresh flowers are perfect for short indoor events but require pre-hydration and occasional misting. On the other hand, artificial flowers are low-maintenance, long-lasting, and designed to look camera-ready. High-quality faux blooms ensure vibrant colors without the risk of wilting, making them ideal for multi-day events or outdoor settings with high temperatures. For the best results, choose artificial flowers with a matte finish to avoid glare in photos.
For a balanced approach, you can combine artificial greenery as a base with fresh floral accents. Just be sure to assemble the fresh elements close to the event start time to avoid wilting. This hybrid method allows for a custom look while keeping practical concerns in check.
If you’re in the Marietta area, consider working with Marietta Floral Design. They specialize in handcrafted floral arrangements and can help you source the perfect flowers and greenery to bring your vision to life.
Building Your Floral Photo Wall: Step-by-Step
Creating a floral photo wall is all about layering with care and precision. While it takes some effort to ensure stability and structure, the end result is a stunning backdrop that’s sure to impress.
Preparing the Base
Start with a sturdy base that can handle the weight of your flowers and remain stable throughout your event. A great option is using two 80 in x 40 in plywood sheets joined by three 3–5 in door hinges (top, middle, and bottom). This makes the structure foldable and reusable. Secure the hinges with ½–¾ in screws (adjust based on the plywood’s thickness), and if any screws stick out, trim them with wire snips.
To keep the base stable, here are a few options:
- Lean it against a solid wall for support.
- Add triangular trusses to the back edges using a nut-and-bolt system for a freestanding design.
- Use a three-panel setup, angling the outer panels inward for self-support.
- For foam boards, attach them to the wall with industrial-grade Velcro strips on all four corners (make sure the wall is clean first).
"Starting with a sturdy frame or base is crucial to support the weight of the flowers and maintain the structure's integrity." – Lemon8
If people will stand in front of the wall, leave 18–24 inches of clearance from the floor. This prevents stems from being crushed and improves photo composition. Also, ensure the base is completely level - any tilt, no matter how small, can look exaggerated in photos. Once the base is secure, it’s time to move on to the greenery layer.
Attaching the Greenery Layer
The greenery layer serves as the foundation for your design, creating a lush backdrop that hides the base structure. Before attaching anything, lay out your greenery on the floor to plan your coverage. Black 4-inch zip ties are perfect for securing greenery to frames, grids, or mesh bases without causing damage. If you’re using boxwood panels or a mesh base, you can thread long stems directly into the grid, avoiding the need for adhesives.
For painted surfaces, gaffers tape works wonders, while hot glue is ideal for foam boards. Floral designer Courtney Kroymann shares her advice:
"I love using gaffers tape to hang greenery on walls as it doesn't leave a residue or damage paint or wallpaper." – Courtney Kroymann, Floral Designer
On wood or concrete surfaces, Command strips provide a damage-free solution. Arrange the greenery in soft, flowing arcs to mimic natural patterns, ensuring the base is fully covered. Any gaps can be filled later with smaller stems or filler flowers. Once the greenery provides a seamless background, you’re ready to add the flowers.
Adding Flowers and Finishing Touches
With the greenery in place, it’s time to bring your design to life with flowers. Use the 60/30/10 rule to create a balanced composition: 60% focal blooms, 30% secondary flowers, and 10% accents. Arrange these in an off-center triangular cluster to add depth, pulling some blooms slightly forward (1–2 inches) and tucking darker foliage behind.
Keep the focal point of your design between 48–60 inches from the floor - this aligns with most people’s eye level for better photos. If you’re working with fresh flowers, use water picks and angle the blooms downward to prevent wilting. For artificial flowers, zip ties or hot glue will secure them firmly.
| Attachment Method | Best For | Key Advantage |
|---|---|---|
| Zip Ties | Frames, mesh grids | Secure and removable |
| Gaffers Tape | Painted walls, wallpaper | No residue or damage |
| Hot Glue | Foam board, canvas | Strong, permanent bond |
| Stem Threading | Boxwood panels | No adhesive needed |
Fill any remaining gaps with small blooms, berries, or filler flowers like baby’s breath to ensure no backing material is visible. Step back often to check your work from different angles - what looks great up close might need adjustments from afar. For lighting, aim for 300–500 lux with a Color Rendering Index (CRI) of 90+ to keep colors vibrant and photos crisp. If you’re using fresh flowers, finish by lightly misting them, and your floral photo wall will be ready to shine at your event.
Design Tips for Your Floral Photo Wall
Color Coordination and Theme Matching
Start with one standout bloom to anchor your color palette. Alethea Harampolis, Cofounder of Homestead Design Collective, shares this approach:
One particularly beautiful bloom starts the composition... The rest of the materials and colors follow from that.
Using the color wheel can help refine your design. For bold, energetic vibes, go for complementary colors like blue and orange. If you're aiming for a softer, more cohesive look (great for weddings), try an analogous scheme with hues like orange, apricot, and golden yellow. A triadic palette - featuring three evenly spaced colors such as purple, orange, and green - adds a lively yet balanced feel. For a sleek, modern aesthetic, stick to a monochromatic scheme by playing with varying shades and tints of a single color.
Consider the season and lighting when choosing your palette. Pastels and whites shine in spring or summer daylight, while deep reds, oranges, and browns bring warmth to fall events or evening settings. For corporate gatherings, neutral tones or colors tied to your brand can tie the design together. If your flowers are pale, use a darker backdrop - like painted plywood or fabric - to make them stand out in photos.
Balancing and Spacing Flowers
Once your color palette is set, focus on arranging your blooms for a balanced look. Visual harmony doesn’t require perfect symmetry; instead, aim for controlled asymmetry. Sarah Thompson offers this helpful guideline:
Adopt the 60/30/10 ratio: 60% base foliage, 30% secondary blooms, and 10% high-impact accents.
This balance ensures a visually pleasing arrangement without overwhelming the eye.
Use triangular clusters by grouping flowers in sets of three - small, medium, and large - to keep the design dynamic. Build your greenery base in soft arcs or diagonal lines before adding flowers. This prevents the arrangement from feeling too rigid or grid-like, giving it a natural sense of movement.
Adding Personal Touches
Personal details can elevate your floral wall from beautiful to unforgettable. Neon signs with hashtags, quotes, or monograms create fun, shareable moments for social media. For weddings, consider attaching engagement photos or family heirloom images to foam boards with ribbon for a sentimental touch. At corporate events, logos or branding elements in contrasting colors - like white or gold against greenery - can make a bold statement.
You can also weave in non-floral elements that match your event's theme. For a beauty event, add lipstick tubes; for food-themed gatherings, include fresh fruits or vegetables. For milestone celebrations, use flowers with personal meaning or arrange them into initials. Add depth with vintage vases, candles, or books at the base of the display for a three-dimensional effect. If you’re mounting heavier items like wooden monograms or neon signs, ensure you use sturdy hardware, such as saw-tooth hangers, and confirm your base structure can handle the weight.
Conclusion
Building a custom floral photo wall takes careful planning and attention to detail. Start with a sturdy base and layer thoughtfully - beginning with greenery, adding focal flowers, and finishing with fillers. Keep in mind, creating an 8′×8′ floral wall from scratch can take around 80 hours, while pre-made artificial options might only take 5–15 minutes to set up.
Once the wall is assembled, refining the design is key. Strive for balance and add personal touches like neon signs, custom monograms, or themed props to make it stand out. Regularly step back to evaluate the composition and fill in any gaps to ensure a polished result.
DIY floral walls typically cost between $150 and $500. While this route can be budget-friendly, hiring a professional ensures structural stability, proper lighting, and expert color coordination. For those in Metro Atlanta, companies like Marietta Floral Design (https://mariettafloraldesign.com) offer tailored event floral installations. Their team uses locally sourced flowers to craft stunning backdrops that photograph beautifully.
Professionals also pay close attention to lighting and focal heights - usually set at 48–60 inches - to enhance every detail in photos. This level of precision can elevate your photo wall from ordinary to extraordinary.
Whether you decide to tackle the project yourself or bring in experts, a thoughtfully designed floral photo wall guarantees a picture-perfect centerpiece for any event.
FAQs
What size floral wall should I build for my event?
When deciding on the size of your floral wall, consider both your event space and the impression you want to make. For cozy, intimate settings, a 4x4-foot wall is a great choice. If you're working with a larger venue or aiming for a more striking visual, opt for bigger dimensions like 7x5 feet or 8x6 feet. The key is to pick a size that enhances your space without dominating it.
How do I keep a floral photo wall stable and safe?
To keep everything stable and safe, set up a strong support system like a freestanding frame, backdrop stand, or a firmly anchored wall. Use suitable tools like nails, Command hooks, zip ties, or heavy-duty adhesive strips, depending on the type of surface you're working with. Double-check that the structure is securely fastened and positioned in a roomy area to avoid any mishaps during your event.
How far in advance can I assemble it without flowers wilting?
It’s a good idea to put together the floral photo wall 1 to 2 days before the event to ensure the flowers stay fresh and lively. To check their condition, leave the flowers on the counter overnight. If they’re still perky in the morning and not drooping, they’re ready to use. Generally, fresh flowers last 3 to 5 days, though some types can hold up to 7 days if cared for properly.